| 일 | 월 | 화 | 수 | 목 | 금 | 토 |
|---|---|---|---|---|---|---|
| 1 | ||||||
| 2 | 3 | 4 | 5 | 6 | 7 | 8 |
| 9 | 10 | 11 | 12 | 13 | 14 | 15 |
| 16 | 17 | 18 | 19 | 20 | 21 | 22 |
| 23 | 24 | 25 | 26 | 27 | 28 | 29 |
| 30 |
- LGTM
- ChatGPT
- SwiftUI VStack
- 하드디스크 삭제 원리
- unittest
- os_log
- firestore
- 함수형 프로그래밍
- 오픈소스
- flutter
- MVVM
- SwiftUI
- swift github action
- print 단점
- Swift
- Firebase
- auto_assign
- 함수형 코딩
- 2기화이팅
- combine
- CI
- XCTest
- xcode
- 액션과 계산 데이터
- Swift thread
- swift CI 적용
- 쏙쏙 들어오는 함수형 코딩
- github
- IOS
- Apple Developer Academy @ POSTECH
- Today
- Total
개발공방
Swift UIBezierPath 크리스마스 트리 본문
크리스마스를 맞아 평소 해보고 싶었던 UIBezierPath를 끄적여 보기로 했다.
다들 즐거워하는 크리스마스이기 때문에 그냥 그림을 그리기 보단 의미있는 것을 그리고 싶었다.
그래서 크리스마스 트리를 그리기로 결정했다.
UIBezierPath가 어떤건지 대충 알긴하지만 직접 사용해본적은 없었기에, 꽤나 흥미로웠다.
참고 : https://zeddios.tistory.com/814
zedd님의 정리를 참고했다.
정리가 매우 완벽하기 때문에 다른 글을 필요없이 저 시리즈를 쭉 훑어보면 이해가 될 것 같다.
zedd님의 글엔 사람들의 이해를 돕기위해 viewDidLoad나 draw 함수에 다 정의되어 있는데, 난 내 방식대로 코드를 짰다.
(property를 미리 만들고, 그리는 함수를 분리하는 식)
(보시는분들 편하게끔 파일을 각각 분리하진 않고 하나의 ViewController에 만들었는데 코드 블럭마다 파일 명을 다르게 주석을 적어뒀다 헷갈리지 않게 끔 하기 위함이다. 마지막에 전체 코드가 있다)
우선 ViewController를 하나 만들어주고 내부에 UIView를 하나 만들어준다.
// BezierPathViewController.swift

import UIKit

import SnapKit

final class BezierPathViewController: BaseViewController {
    private lazy var bezierView = BezierExamView()

    override func render() {
        view.addSubview(bezierView)
        bezierView.snp.makeConstraints {
            $0.edges.equalToSuperview()
        }
    }
}
난 BaseViewController를 만들어 쓰고 있기 때문에 render 함수가 있는데 그냥 viewDidLoad라 생각하면 편하다.
(Layout을 잡기 위한 코드를 모아두는 함수)
// BezierExamView.swift

private let firstTreeBezierPath: UIBezierPath = {
    let bezier = UIBezierPath()
    bezier.lineWidth = 2
    bezier.lineJoinStyle = .round
    bezier.usesEvenOddFillRule = true
    return bezier
}()
우선 UIBezierPath를 하나 만들어 주고
// BezierExamView.swift

private enum Size {
    static let width = UIScreen.main.bounds.width
}

override func draw(_ rect: CGRect) {
    drawFirstTree()
}

private func drawFirstTree() {
    firstTreeBezierPath.move(to: CGPoint(x: Size.width / 2, y: 200))
    firstTreeBezierPath.addLine(to: CGPoint(x: 60, y: 350))
    firstTreeBezierPath.addLine(to: CGPoint(x: Size.width - 60, y: 350))
    drawStrokeAndFill(firstTreeBezierPath, fillColor: .systemGreen)
}
draw 부분에서 그려준다.
그려주는 코드를 보면 firstTreeBezierPath.move() 함수는 시작지점이 어딘지 설정하는 코드다
Size.width 는 현재 기기의 전체 width이기 때문에 그 값의 절반 == 화면의 가운데 이다.
y는 대충 200정도에서 시작하면 좋을 것 같아서 설정했다.
그 다음 addLine 인데 그 다음 이어질 선이 어디 지점으로 이으면 되는지 설정하는 코드다.
60에 350의 위치에 점을 찍고 연결한다고 생각하면 편하다.
private func drawStrokeAndFill(_ bezierPath: UIBezierPath, fillColor: UIColor) {
    bezierPath.close()
    UIColor.black.set()
    bezierPath.stroke()
    fillColor.set()
    bezierPath.fill()
}
요 부분은 너무 중복되서 분리한 코드다.
close() 를 하면 모든 선들을 다 연결해준다.
stroke() 는 테두리의 색이다.
fill()은 내부의 색을 채우는 코드다.
UIColor을 set 해주고 stroke와 fill을 실행하면 해당 색이 적용된다.
그럼 아래와 같은 세모가 만들어 질 것이다.

트리가 완성되려면 최소한 3개정도는 있어야 한다고 생각했다.
// BezierExamView.swift

private let firstTreeBezierPath: UIBezierPath = {
    let bezier = UIBezierPath()
    bezier.lineWidth = 2
    bezier.lineJoinStyle = .round
    bezier.usesEvenOddFillRule = true
    return bezier
}()
private let secondTreeBezierPath: UIBezierPath = {
    let bezier = UIBezierPath()
    bezier.lineWidth = 2
    bezier.lineJoinStyle = .round
    bezier.usesEvenOddFillRule = true
    return bezier
}()
private let thirdTreeBezierPath: UIBezierPath = {
    let bezier = UIBezierPath()
    bezier.lineWidth = 2
    bezier.lineJoinStyle = .round
    bezier.usesEvenOddFillRule = true
    return bezier
}()
똑같은 친구를 3개 만들어 주고
private func drawFirstTree() {
    firstTreeBezierPath.move(to: CGPoint(x: Size.width / 2, y: 200))
    firstTreeBezierPath.addLine(to: CGPoint(x: 60, y: 350))
    firstTreeBezierPath.addLine(to: CGPoint(x: Size.width - 60, y: 350))
    drawStrokeAndFill(firstTreeBezierPath, fillColor: .systemGreen)
}

private func drawSecondTree() {
    secondTreeBezierPath.move(to: CGPoint(x: Size.width / 2, y: 250))
    secondTreeBezierPath.addLine(to: CGPoint(x: 40, y: 450))
    secondTreeBezierPath.addLine(to: CGPoint(x: Size.width - 40, y: 450))
    drawStrokeAndFill(secondTreeBezierPath, fillColor: .systemGreen)
}

private func drawThirdTree() {
    thirdTreeBezierPath.move(to: CGPoint(x: Size.width / 2, y: 300))
    thirdTreeBezierPath.addLine(to: CGPoint(x: 20, y: 550))
    thirdTreeBezierPath.addLine(to: CGPoint(x: Size.width - 20, y: 550))
    drawStrokeAndFill(thirdTreeBezierPath, fillColor: .systemGreen)
}
적절한 크기를 가지게끔 만들어 준다.

그럼 위처럼 빨리감기 버튼 같이 생긴 나무(?) 가 완성 된다.
여기서 중요한게 해당 함수들의 실행 순서인데
override func draw(_ rect: CGRect) {
    drawThirdTree() // 세 번째
    drawSecondTree() // 두 번째
    drawFirstTree() // 첫 번째
}
세 번째 나무부터 그린다.
그 이유는 그리면 위에 덮어 씌어지는 방식인데 순서대로 그린다면

이렇게 아주 못생기게 나오기 때문이다
그래서 잘 덮어 씌어지도록 순서를 바꿔서 실행시켜준다.
그리고 나무 부분도 필요하기 때문에 위와 같은 맥락으로 코드를 추가해준다.

나무 까지 그렸는데, 너무 심심해 보여서 별을 추가해야겠다 생각했다.

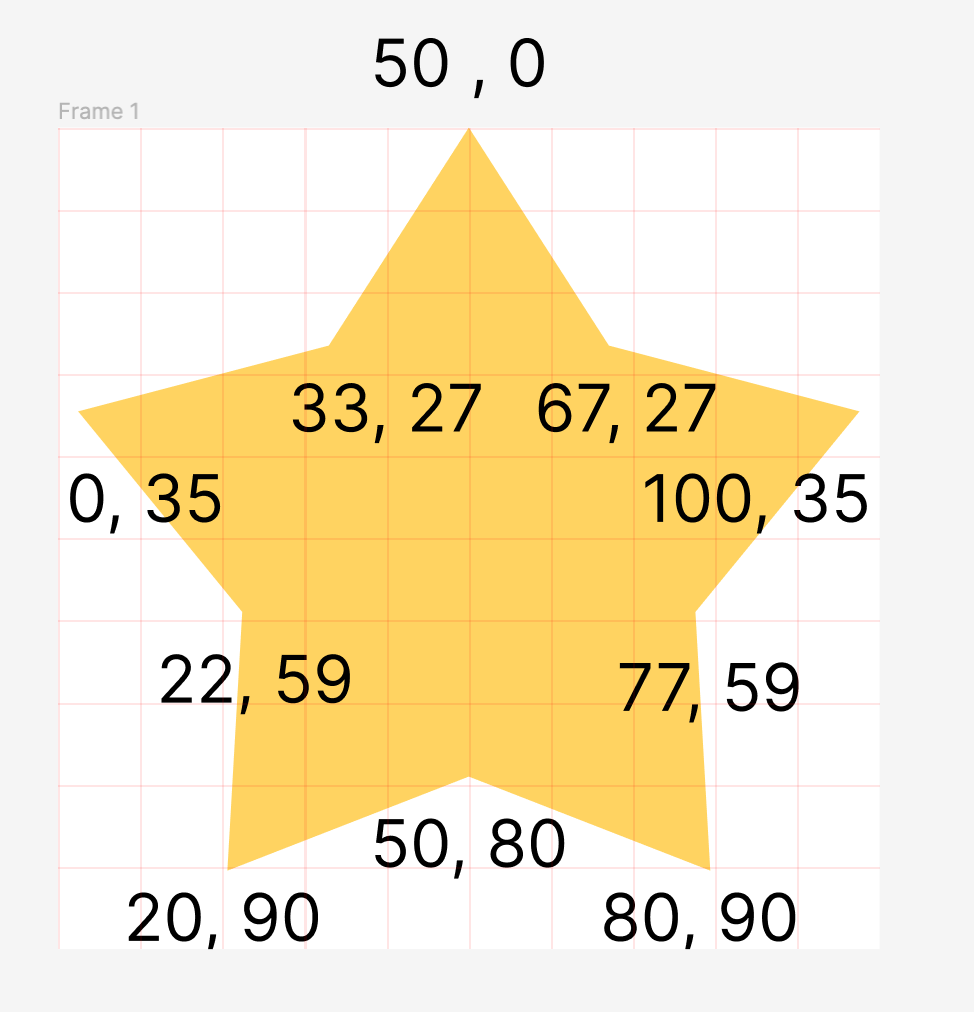
이런 모양의 별을 추가하려 했는데, 각각의 점들을 머리속으로 생각하려니 너무 헷갈렸다.
그래서 피그마에서 별을 그리고

각각의 점마다 좌표를 적어 둔 다음에 코드로 추가했다.
// StarView.swift

private lazy var width = self.frame.width
private lazy var height = self.frame.height

private func drawStar() {
    starBezierPath.move(to: CGPoint(x: width / 2, y: height * 0.01))
    starBezierPath.addLine(to: CGPoint(x: width * 0.33, y: height * 0.27))
    starBezierPath.addLine(to: CGPoint(x: width * 0.01, y: height * 0.35))
    starBezierPath.addLine(to: CGPoint(x: width * 0.22, y: height * 0.59))
    starBezierPath.addLine(to: CGPoint(x: width * 0.20, y: height * 0.90))
    starBezierPath.addLine(to: CGPoint(x: width * 0.50, y: height * 0.80))
    starBezierPath.addLine(to: CGPoint(x: width * 0.80, y: height * 0.90))
    starBezierPath.addLine(to: CGPoint(x: width * 0.77, y: height * 0.59))
    starBezierPath.addLine(to: CGPoint(x: width * 0.99, y: height * 0.35))
    starBezierPath.addLine(to: CGPoint(x: width * 0.67, y: height * 0.27))
    starBezierPath.close()
    UIColor.black.set()
    starBezierPath.stroke()
    UIColor.systemYellow.set()
    starBezierPath.fill()
}
width와 height에 곱하기를 한 이유는 적절한 비율 만큼 위치를 잡기 위해서이다.
난 100x100 사이즈로 만들거긴 하지만 혹시 200x200으로 바뀔 수도 있어서 해당 값들에 맞게끔 코드를 짰다.
// BezierExamView.swift

private let starView = StarView(frame: CGRect(origin: .zero, size: CGSize(width: 100, height: 100)))

override init(frame: CGRect) {
    super.init(frame: frame)
    backgroundColor = .white
    self.addSubview(starView)
}
별은 property로 만들어서 addSubView를 해줬다.
override func draw(_ rect: CGRect) {
    drawWood()
    drawThirdTree()
    drawSecondTree()
    drawFirstTree()
    starView.frame = CGRect(x: Size.width / 2 - 50, y: 150, width: 100, height: 100)
}
그림이 다 그려졌을 때 위치를 수정하기 위해 starView의 frame을 다시 설정해줬다.

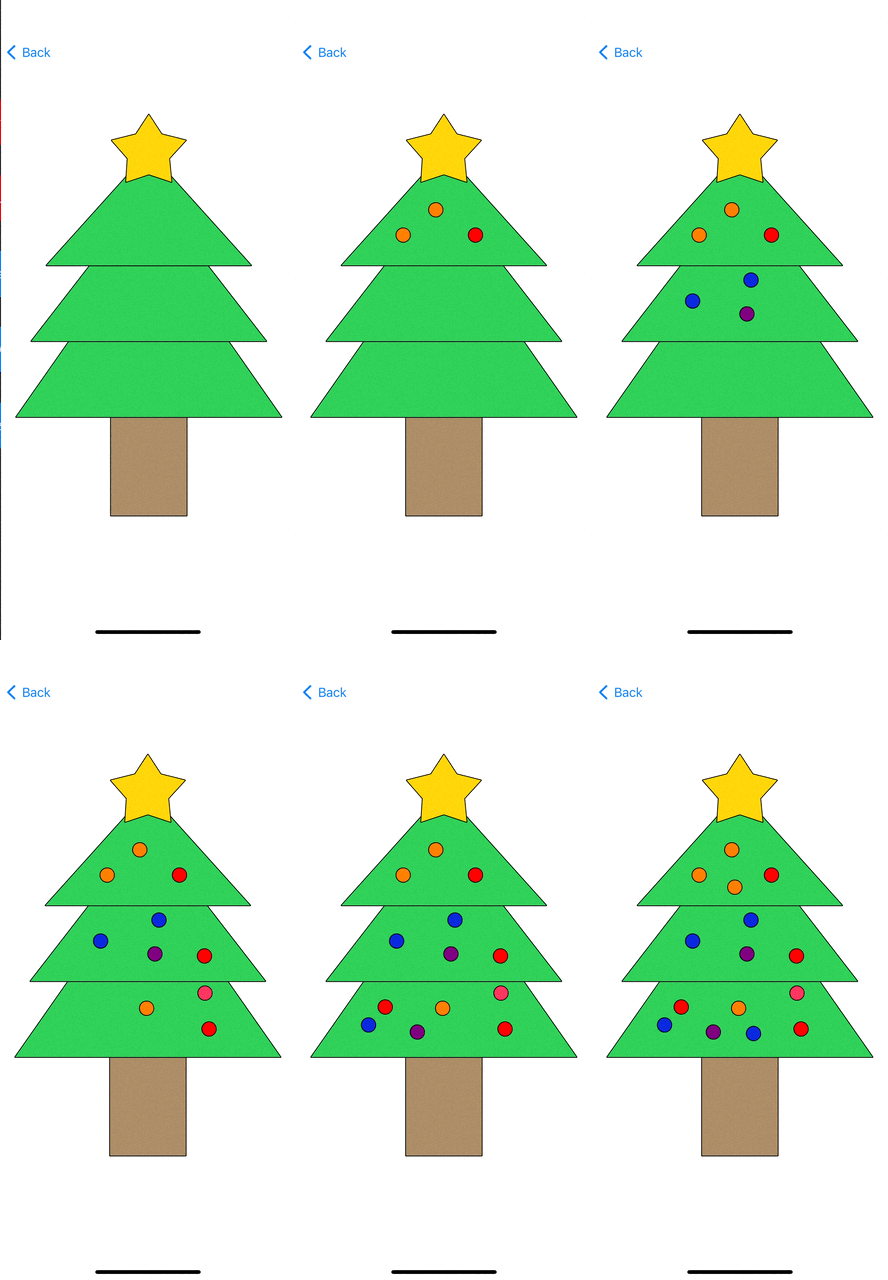
이렇게 트리가 완성 되었다.
여기 까지가 UIBezierPath를 이용한 트리 그리기 이다.
추가적으로 트리가 너무 심심하게 생겨서 장식을 추가해주고 싶었다.
일반적으로 트리를 꾸밀 때 내가 장식을 추가하고 싶은 위치에 장식을 추가하기 때문에, 사용자가 탭한 위치에 장식이 추가되게 만들고 싶었다.
// DecorationView.swift

final class DecorationView: UIView {
    private let colorSet: [UIColor] = [.red, .blue.withAlphaComponent(0.8), .orange, .purple, .systemPink]

    private let random = Int.random(in: 0..<5)

    override init(frame: CGRect) {
        super.init(frame: frame)
        self.layer.borderWidth = 1
        self.layer.borderColor = UIColor.black.cgColor
        self.layer.cornerRadius = frame.width / 2
        self.backgroundColor = colorSet[random]
    }

    required init?(coder: NSCoder) { nil }
}
색상은 5개 정도 만들어 두고, 랜덤으로 해당 색상을 뽑게 만들었다. (blue에 0.8을 준 이유는 너무 쨍해서 이다.)
// BezierPathViewController.swift

final class BezierPathViewController: BaseViewController {
    private lazy var bezierView: BezierExamView = {
        let view = BezierExamView()
        view.isUserInteractionEnabled = true
        let tapGesture = UITapGestureRecognizer(target: self, action: #selector(tapAction(_:)))
        view.addGestureRecognizer(tapGesture)
        return view
    }()

    override func render() {
        view.addSubview(bezierView)
        bezierView.snp.makeConstraints {
            $0.edges.equalToSuperview()
        }
    }

    @objc func tapAction(_ gestureRecognizer: UITapGestureRecognizer) {
        let x = gestureRecognizer.location(in: gestureRecognizer.view).x
        let y = gestureRecognizer.location(in: gestureRecognizer.view).y
        view.addSubview(DecorationView(frame: CGRect(x: x - 10, y: y - 10, width: 20, height: 20)))
    }
}
간단하게 TapGesture를 추가했다.
Tap한 위치에 addSubView 되게끔 만들었다.
최종 화면

크리스마스를 맞아 UIBezierPath를 공부해봤는데, 꽤나 재밌었다.
공대생 다운 트리지만 굉장히 뿌듯하다
다들 메리 크리스마스 ^________^

GitHub - MMMIIIN/UIKit_DevNote: Chemi's UIKit DevNote
Chemi's UIKit DevNote. Contribute to MMMIIIN/UIKit_DevNote development by creating an account on GitHub.
github.com
'Swift > UIKit' 카테고리의 다른 글
| [애니또] MVVM + Combine Input & Output 구조 - 리팩토링 (4) (0) | 2023.07.14 |
|---|---|
| [애니또] MVVM + Combine - 리팩토링 (3) (2) | 2023.06.15 |
| [애니또] MVVM을 선택한 이유 - 리팩토링 (2) (0) | 2023.06.07 |
| [애니또] ViewController와 View의 분리 - 리팩토링 (1) (0) | 2023.04.19 |
| Swift DispatchQueue 기본 원리 (8) | 2022.07.14 |


